How to Cut Continuous Bias Binding Craftsy
Learn how to make continuous bias tape without having to piece together lots of fiddly strips. This is especially handy when you have large amounts of bias to make for quilts or other big sewing projects. This method can save you a lot of time and even beginners can start to make continuous bias tape (also called continuous bias binding).

Contents
- Continuous Bias Tape
- Continuous Bias Tape - Supplies
- Continuous Bias Tape - Video
- How to Make Continuous Bias Tape
- Step 1 - Cut the Diagonal
- Step 2 - Joint the Triangles
- Step 3 - Draw Strips
- Step 4 - Create a Tube
- Step 5 - Offset The Strips
- Step 6 - Stitch the Edges
- Step 7 - Cut in a Spiral
- Step 8 - Press into Continuous Bias Tape
- Pressing the Continuous Bias Tape
- Continuous Bias Tape - Diagram Summary
- Continuous Bias Tape Projects
- More Articles On Bias Tape
Continuous Bias Tape
Continuous bias tape refers to the method used to create bias tape in a spiral tube. Many sewers prefer continuous bias tape as it has fewer joins and no individual piecings which saves time and frustration. This is the favorite bias tape method used by quilters and clothing sewers doing larger projects.
Continuous Bias Tape - Supplies
What you will need –
- FABRIC - At least ½ yard (0.45m) of tightly-woven fabric that can be pressed. Natural fibers such as cotton are best. I like to use squares of quilting cotton. Try and choose fabrics with a small scale print as they will look the best when cut into strips. Fat quarters are great for making continuous bias tape.
- MARKING - Marking pen or chalk with a sharp tip
- MACHINE - Sewing machine that does a small straight stitch
- FOOT - All-purpose sewing foot
- MEASURING - Ruler
Continuous Bias Tape - Video
Watch this quick video from my YouTube channel so you can visualize the process before you start. It is just a few minutes so relax and enjoy!
How to Make Continuous Bias Tape
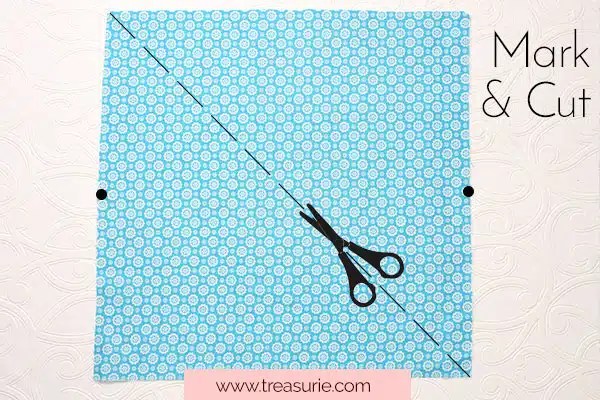
Step 1 - Cut the Diagonal
Cut a large square piece of fabric. The larger the square the less piecing you will have. Mark halfway down 2 opposite sides. (see the circles) Cut along the diagonal so you have 2 equal-sized triangles.
Use a rotary cutter and a quilting ruler for a really clean straight cut. If you use a rotary cutter, don't forget to put a self healing mat underneath to protect your table.
Step 2 - Joint the Triangles
Place your triangles right sides together with the marks matching. See how they overlap with offset to each other.
Stitch a seam about ¼ inch (6mm) from the raw edge. Trim the seam to ⅛ inch (3mm) and press it open.
We sew a ¼ inch or more seam and trim it down because most sewing machines do not like sewing much narrower than that without getting the fabric caught underneath.

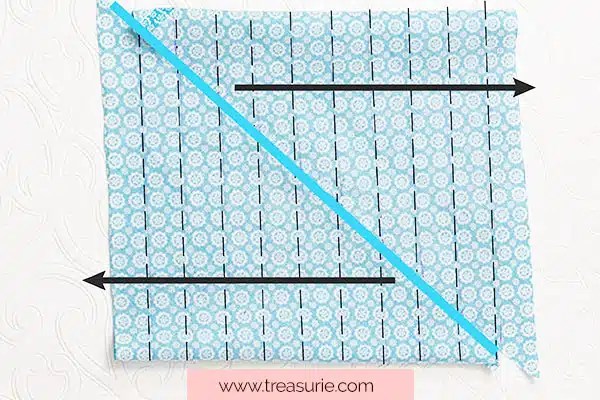
Step 3 - Draw Strips
On the wrong side of the fabric, mark lines at your desired width.
IMPORTANT - Notice that the lines are drawn parallel to the longer sides of the fabric.
Here is how you work out the width of these strips for continuous bias tape.
- Single fold bias - this will be 2 x your final width. (For example, cut 1 inch (2.5cm) for ½ inch (12mm) bias.)
- Double fold bias - this will be 4 x your final width. (For example, cut 2 inches (5cm) for ½ inch (12mm) double-fold bias tape.)

Step 4 - Create a Tube
Now we need to create a tube of continuous bias tape. Bring the short diagonal sides together forming a tube as below.
IMPORTANT - See how it is the shorter ends that we are bringing together in the center. Do not sew the seam yet.

Step 5 - Offset The Strips
Move the edges so that the lines are offset by one strip and carefully pin matching the ends of the lines.
VERY IMPORTANT – Note I said offset lines. If you join the lines up with the edges even you will have tubes (a bit like calamari) and not a continuous strip. Offset the rows by one.
Step 6 - Stitch the Edges
Stitch a ¼ inch (6mm) seam. Trim the seam to ⅛ inch (3mm) and press the seam open.

Step 7 - Cut in a Spiral
Cut along the lines in a continuous bias tape spiral. A couple of my lines went a little off at one of the seams but I just cut as carefully as I could. If you are off just a small amount you can cheat the width when you do the pressing later.

Step 8 - Press into Continuous Bias Tape
Your continuous bias tape is now ready for pressing with a bias maker.

Pressing the Continuous Bias Tape
You can press the strips into single or double fold bias.
See my blog post on how to make bias tape for pressing instructions if you are new to this but here is a summary.
- For single fold bias, press the raw edges to the center on the wrong side. You can do this with a bias tape maker or just freehand. If you do it with your fingers, just go slowly as the tape does get hot and you don't want to burn your fingers. Generally, if I am pressing long strips I will use a bias tape maker and if it is only a small strip I will just use my fingers.
- Double fold bias is pressed a second time so the folded edges meet and no raw edges are visible.

Continuous Bias Tape - Diagram Summary
I have put together some diagrams below to help you better visualize the process. Good luck and I hope you enjoyed learning how to make continuous bias tape.

I'd love to hear in the comments about what you are going to use it for.
Continuous Bias Tape Projects
Now you know how to make continuous bias tape you are ready to sew some projects. The makeup roll pattern featured below is one of my free patterns so why not give it a try. It is great for storing pens for kids as well.
-

Make Up Roll Pattern -

Make Up Roll Pattern
More Articles On Bias Tape
- How to Make Bias Tape
- How to Sew Single Fold Bias Tape
- How to Sew Double Fold Bias Tape
- How to Make Continuous Bias Tape
- How to Sew Mitred Square Corners with Bias Tape
- Types of Bias Tape
- Bias Bound Seam
- Hong Kong Finish
- Sewing Bias Tape
- Types of Bias Tape
- How to Sew a V Neck with Bias Tape
pictonfrinslazince.blogspot.com
Source: https://blog.treasurie.com/continuous-bias-tape/